Recipes
Brazilian Carrot Cake with Chocolate Glaze (Bolo de Cenoura)
Prep
30 min
Cook
35–40 min
Total
1 h 40 min
Servings
12
Difficulty
Easy
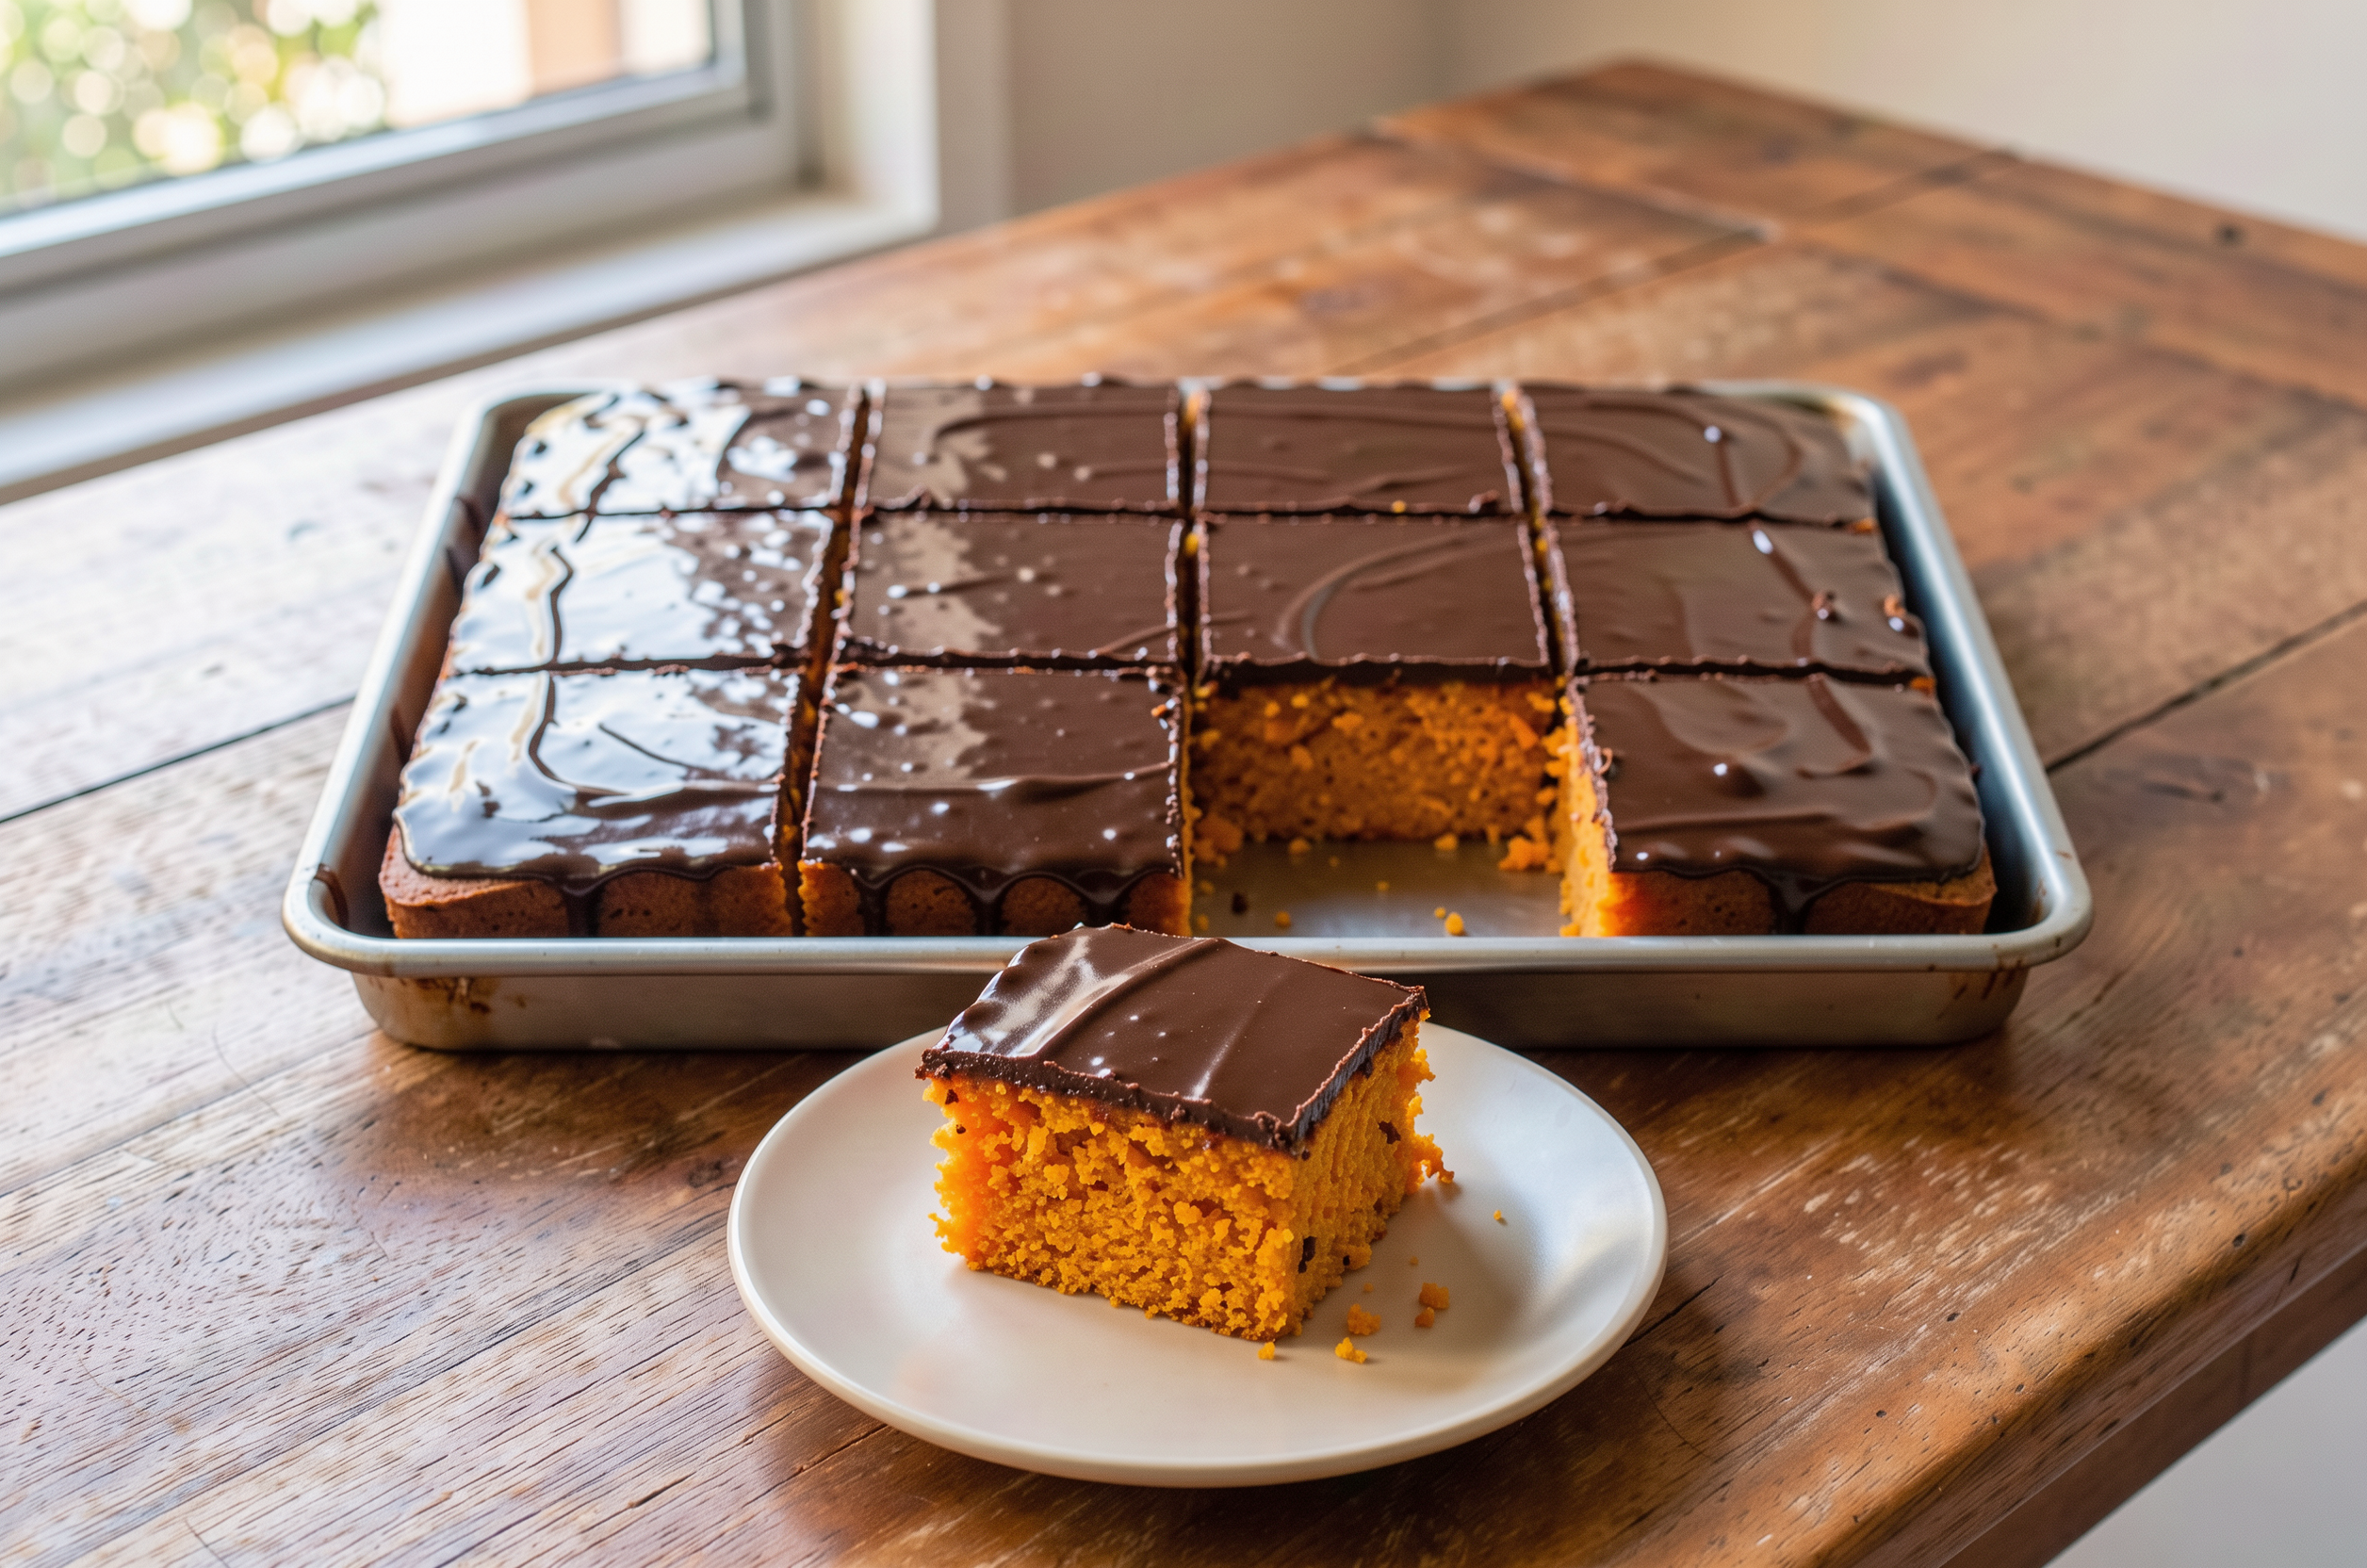
Bolo de cenoura, Brazilian carrot cake with a chocolate topping, is one of the great classics of Brazilian home baking. It is quite different from the spiced, nut-studded carrot cake of the English-speaking world. The crumb is bright orange, moist and tender, with the gentle, slightly earthy sweetness of carrot and no spices to compete with it. On top goes a chocolate glaze that sets as it cools into a soft, glossy layer. The two work because they complement each other: the cake is mild and delicate, while the topping brings the bitterness of cocoa and the richness of butter.
Three decisions give this version its tenderness. The first is using oil in the batter. Oil stays liquid at room temperature, so the cake stays moist for longer than a butter-based cake. The second is blending the raw carrots with the eggs and oil into a completely smooth purée, which spreads moisture and colour evenly through the batter. The third is folding in the flour by hand, away from the blender. Flour mixed at high speed develops too much gluten and gives a rubbery, tight and flat crumb.
The amount of carrot matters just as much. Carrots are about 88% water: too many make the batter heavy and leave the centre damp and dense, while too few give a pale, dry cake. Here, 300 g of peeled carrots are balanced against 280 g of flour.
In Brazil this is an afternoon-coffee cake and a family-table favourite, served in squares straight from the tin, at room temperature or still slightly warm.
At a glance
- Batter base: raw carrots, eggs, oil and sugar blended until smooth; flour, salt and baking powder folded in by hand.
- Expected texture: a light, moist, fine-crumbed cake; a glossy topping that sets without turning hard.
- Oven: 180 °C (350 °F) for 35 to 40 minutes, in a 20 × 30 cm (8 × 12 in) rectangular tin.
- Yield and time: 12 pieces, about 1 hour 40 minutes in total.
- Key points: never mix the flour in the blender, keep the oven door closed for the first 25 minutes, and pour the glaze as soon as it is ready.
- Resting time: 40 minutes (10 minutes for the cake to rest in the tin while the glaze is made, plus 30 minutes for the glaze to set).
- Equipment: kitchen scale, blender, large mixing bowl, sieve, balloon whisk, spatula, 20 × 30 cm (8 × 12 in) rectangular tin about 5 cm (2 in) deep, medium heavy-based saucepan.
- Allergens: contains gluten, eggs and milk.
Recipe details
- Prep
- 30 min
- Cook
- 35–40 min
- Total
- 1 h 40 min
- Servings
- 12
- Difficulty
- Easy
- Category
- Recipes
- Diet
- Vegetarian (lacto-ovo)
- Portion size
- about 110 g
Ingredients
For the batter
For the tin
For the glaze
Method
Preparing the tin, the oven and the carrots
Step 1: Preheat the oven to 180 °C (350 °F), conventional heat, for at least 15 minutes, with the rack in the centre. For a fan oven, use 160 to 165 °C (320 to 330 °F).
Step 2: Grease the base and sides of the tin with the butter or oil. Dust with the flour, tilt the tin to coat every surface and tap out the excess. If you want to lift the whole cake out later, also line the base with baking paper, leaving an overhang on the two long sides to use as handles.
Step 3: Wash the carrots under running water before peeling. Peel them, trim the ends and weigh them after peeling, since the skin and ends account for 10% to 15% of the weight. Cut into slices about 1 cm (½ in) thick.
Making the batter
Step 4: Put the carrots, eggs and oil into the blender, in that order. With the liquids at the bottom, the blades turn freely without jamming.
Step 5: Blend on high speed for 2 to 3 minutes, until you have a completely smooth, bright orange purée. To check, stop the blender, dip a clean spoon into the purée and let it run back into the jug. It should flow off in a steady, even stream, with no visible flecks of carrot left on the spoon. If you still see small pieces, blend for another 30 seconds and check again. Any pieces left behind create damp, heavy spots in the crumb. If your blender is not very powerful, blend in two batches.
Step 6: Add the sugar and blend for 1 more minute, until the mixture turns slightly paler and gains a little volume.
Step 7: Sift the flour and salt into a large bowl and make a well in the centre.
Step 8: Pour the carrot mixture into the well. Using the whisk, stir in circles from the centre outwards only until no dry pockets remain, about 40 to 60 seconds. The batter should be smooth and thick, and fall from the whisk in a ribbon.
Step 9: Sprinkle the baking powder over the batter and fold it in with 8 to 10 gentle strokes, lifting from the bottom of the bowl, until it disappears.
Baking
Step 10: Pour the batter into the tin straight away and spread it into the corners. Tap the tin lightly on the worktop twice to release any large air bubbles.
Step 11: Bake for 35 to 40 minutes, without opening the oven during the first 25 minutes. Before the structure has set, a sudden drop in temperature can make the centre sink.
Step 12: Start checking at 35 minutes. The cake is done when it shows all of these signs: a golden surface with a few light cracks in the centre; edges beginning to pull away from the tin; a centre that springs back when pressed lightly, without leaving a dent; and a skewer inserted in the centre that comes out clean or with a few moist crumbs, with no liquid batter. If you use a kitchen thermometer, the centre should read about 95 °C (203 °F).
Step 13: Remove from the oven and leave the cake in the tin, on a wire rack or heatproof surface. If you want some of the glaze to soak into the top, prick a few shallow holes with a fork now, without going all the way through. Start the glaze immediately: it takes about 10 minutes, the same time the cake needs to rest.
Making the glaze
Step 14: Put the 120 ml of milk, the sugar, the sifted cocoa and the butter into the saucepan. Stir with the heat still off until the cocoa dissolves. Cocoa clumps easily in hot liquid, and dissolving it cold avoids the problem.
Step 15: Bring to the boil over medium heat, stirring constantly. Use a medium pan, because the glaze rises as it boils.
Step 16: Lower the heat to medium-low and simmer steadily for 3 to 4 minutes, stirring all the time and scraping the base and edges of the pan. It is ready when it has thickened slightly and coats the back of a spoon: when you draw a finger across the spoon, the line closes up slowly. The glaze should still pour easily.
Step 17: Take the pan off the heat, add the chopped chocolate and leave it for 1 minute. Stir until the glaze is smooth and glossy. The boiling time determines the final texture. Undercooked, the glaze runs off and soaks the top of the cake. Overcooked, it thickens, loses its shine and may turn grainy as it cools. If it thickens before you pour it, add 1 to 2 tablespoons of the reserved milk and warm it for about 1 minute, stirring.
Finishing and serving
Step 18: Pour the still-hot glaze over the warm cake, starting from the centre, and quickly spread it to the edges with the spatula. At this temperature the glaze almost levels itself. Once it cools, it holds the marks of the spatula and sets unevenly.
Step 19: Leave to rest at room temperature, uncovered, for about 30 minutes, until the glaze is no longer liquid and feels set to the touch. On hot days this can take longer.
Step 20: Cut into 12 squares (3 × 4) with a long knife dipped in hot water and wiped dry between each cut, so the glaze doesn't drag.
Tips
- Weigh the flour. A cup of flour can weigh anywhere from 110 to 150 g depending on how it is filled, and that difference can leave the cake dry or heavy. Without a scale, spoon the flour into the cup without packing it down and level it with a knife.
- Choose firm carrots with deep colour. Limp carrots have lost water and flavour, and very thick ones often have a woody core. Deep orange carrots, rich in beta-carotene, give a more vivid crumb.
- Use eggs at room temperature. Cold eggs form a less stable emulsion with the oil. To warm them quickly, place the whole eggs in warm water for 5 minutes.
- Stick to a neutral oil. Extra virgin olive oil and other flavoured oils compete with the delicate taste of carrot. Sunflower, corn, rapeseed (canola) and soybean oil keep the carrot and chocolate in the foreground.
- Check your baking powder and bake the batter promptly. Baking powder starts reacting as soon as it meets moisture, and batter that sits around loses some of its rise. To test it, stir ½ teaspoon into ¼ cup (60 ml) of hot water. If it doesn't bubble vigorously, replace it.
- Get to know your oven. Many home ovens run 10 to 20 °C above or below the dial setting. If the cake browns too much on the outside before the centre sets, lower the temperature by 10 °C next time and add a few minutes. An oven thermometer removes the guesswork.
- Don't taste the raw batter. Raw eggs and raw flour can carry microorganisms that are only destroyed by baking. Wash your hands and utensils after handling the eggs.
- Don't skip the salt. The 2 g won't make the cake taste salty, but they keep it from tasting flat and one-dimensionally sweet.
- Cracks on top are normal. They show the batter has risen well, and the glaze hides them completely.
Variations
With creamy brigadeiro topping
Brigadeiro is Brazil's favourite chocolate fudge confection. Replace the whole glaze with 1 can of sweetened condensed milk (395 g), 20 g cocoa powder, 20 g butter and 100 g single (light) cream. Cook the condensed milk, cocoa and butter over low heat, stirring constantly, for 6 to 8 minutes, until the mixture thickens and starts to come away slightly from the base of the pan. Add the cream and cook for 1 more minute. Spread while still warm over the cooled cake. The topping is thicker, sweeter and creamier, with the texture of spoonable brigadeiro, and does not set into a firm layer. This version significantly changes the nutritional composition of the original recipe.
With orange
In step 4, add the finely grated zest of 1 large orange to the blender, using only the coloured part of the peel; the white pith is bitter. The method stays the same. The orange adds a citrus fragrance that lifts the carrot and pairs well with the chocolate. The nutritional composition is practically unchanged.
With cinnamon and walnuts
Sift 1 teaspoon of ground cinnamon (about 2.5 g) and ¼ teaspoon of freshly grated nutmeg with the flour. After folding in the baking powder, fold in 60 g roughly chopped walnuts tossed in 1 tablespoon of the recipe's flour so they don't sink. The cake becomes more aromatic and gains some crunch, moving closer to an American-style carrot cake. This version significantly changes the nutritional composition of the original recipe.
With some wholemeal flour
Replace 90 g of the plain flour (about one third) with fine wholemeal (whole wheat) flour. Add 20 ml of milk to the batter along with the carrot mixture, because wholemeal flour absorbs more liquid. Don't replace all of the flour, or the cake will turn heavy and crumbly. The flavour becomes more rustic, the crumb slightly denser, and the fibre content increases. The nutritional composition changes moderately.
FAQ
The most common causes are flour mixed in the blender or overmixed, too much carrot (weighing prevents this), weak or expired baking powder, opening the oven before 25 minutes and not preheating the oven. A cake taken out too early can also sink as it cools, so check all the signs of doneness, not just the colour.
You can, but the result changes. Grated carrot stays in visible strands, the crumb is more rustic and less evenly moist, and the colour is speckled. In that case, whisk the eggs, oil and sugar together by hand and fold in the finely grated carrot along with the flour.
Yes. Use a 22 to 24 cm (9 to 9½ in) tube tin with a central funnel, well greased and floured, including the funnel. Bake at 180 °C (350 °F) for 40 to 45 minutes and test with a skewer. Turn the cake out after about 10 minutes, while still warm. Make the glaze during that time and pour it over the unmoulded cake.
You can, with adjustments. Use 200 g unsalted butter, melted and lukewarm. Since butter is about 80% fat, that amount matches the fat in 165 g of oil. The flavour becomes more buttery, but the cake is firmer when cold, because butter solidifies. For a carrot cake that stays tender for longer, oil works better.
You can. Use 50 g of sweetened drinking chocolate powder instead of the cocoa and reduce the sugar to 60 g, since the powder is already sweetened. The flavour will be milder and less intense. Keep the semisweet or dark chocolate to give the glaze body and shine.
The glaze goes onto the cake while it is still warm, but the cake should only be covered or put away once it has cooled completely. After glazing, leave it uncovered at room temperature until it is cold all the way through, which usually takes 1½ to 2 hours from the time it comes out of the oven. Covering a warm cake traps steam, which condenses, softens the glaze and leaves the surface damp, conditions that favour mould.
Once cold, well covered and kept somewhere cool and dry, it usually keeps well for up to 2 days. On hot or humid days, or for longer storage, keep it in the fridge in an airtight container and eat it within 4 to 5 days. In the fridge the glaze hardens and the crumb firms up: let a slice sit at room temperature for 20 to 30 minutes before serving, or warm it in the microwave for 10 to 15 seconds. Discard the cake if you see mould or notice an off smell or a sticky texture.
Yes. Freeze the cake once completely cold, in slices, with the glaze already set. Wrap each slice in cling film and store in a well-sealed container or freezer bag. For best quality, eat within 2 to 3 months. Kept continuously frozen, it remains safe beyond that, but tends to dry out and pick up odours. Thaw it still wrapped in the fridge overnight, or at room temperature for about 1 hour. The wrapping stops moisture condensing on the cake. The glaze may lose some of its shine.
Nutrition
Nutrition information is not available for this recipe yet.
Reviews
There are no reviews for this recipe yet.
Emma cooking Team
The editorial team behind Emma cooking, sharing recipes, techniques and inspiration for everyday cooking.